A Galaxy A54 that loops after an OTA needs a repair path that protects the remaining evidence. The first boot after a One UI update has to mount encrypted user data, finish app optimization, and hand off from Samsung’s boot chain into Android. If the phone restarts every minute, freezes at the carrier splash, or opens Android Recovery after a failed update, the useful question is what still responds.
This guide is for owner-authorized repair on Galaxy A54 5G units such as SM-A546B and SM-A546B/DS, SM-A546E and SM-A546E/DS, SM-A546U, SM-A546U1, SM-A546W, and SM-A5460. Those models share the A54 name, yet firmware region, carrier package, CSC, and bootloader revision can differ. Treat the model code as the repair anchor.
Use this before a reset or firmware write. The goal is to find the least destructive path that still matches the symptom. Avoid account bypass, IMEI work, lock removal, patched tools, and random firmware packages. If the phone has photos, authenticator apps, banking tokens, work data, or local chat backups that are missing from cloud backup, every reset or firmware choice has to start with the data risk.
Read the loop first
One slow boot after an update can be normal. A full One UI upgrade may sit on the Samsung logo longer than a normal restart while Android rebuilds app state. A real boot loop repeats. The screen goes black and returns to the logo, the device vibrates and restarts, or Recovery reports that the update failed.
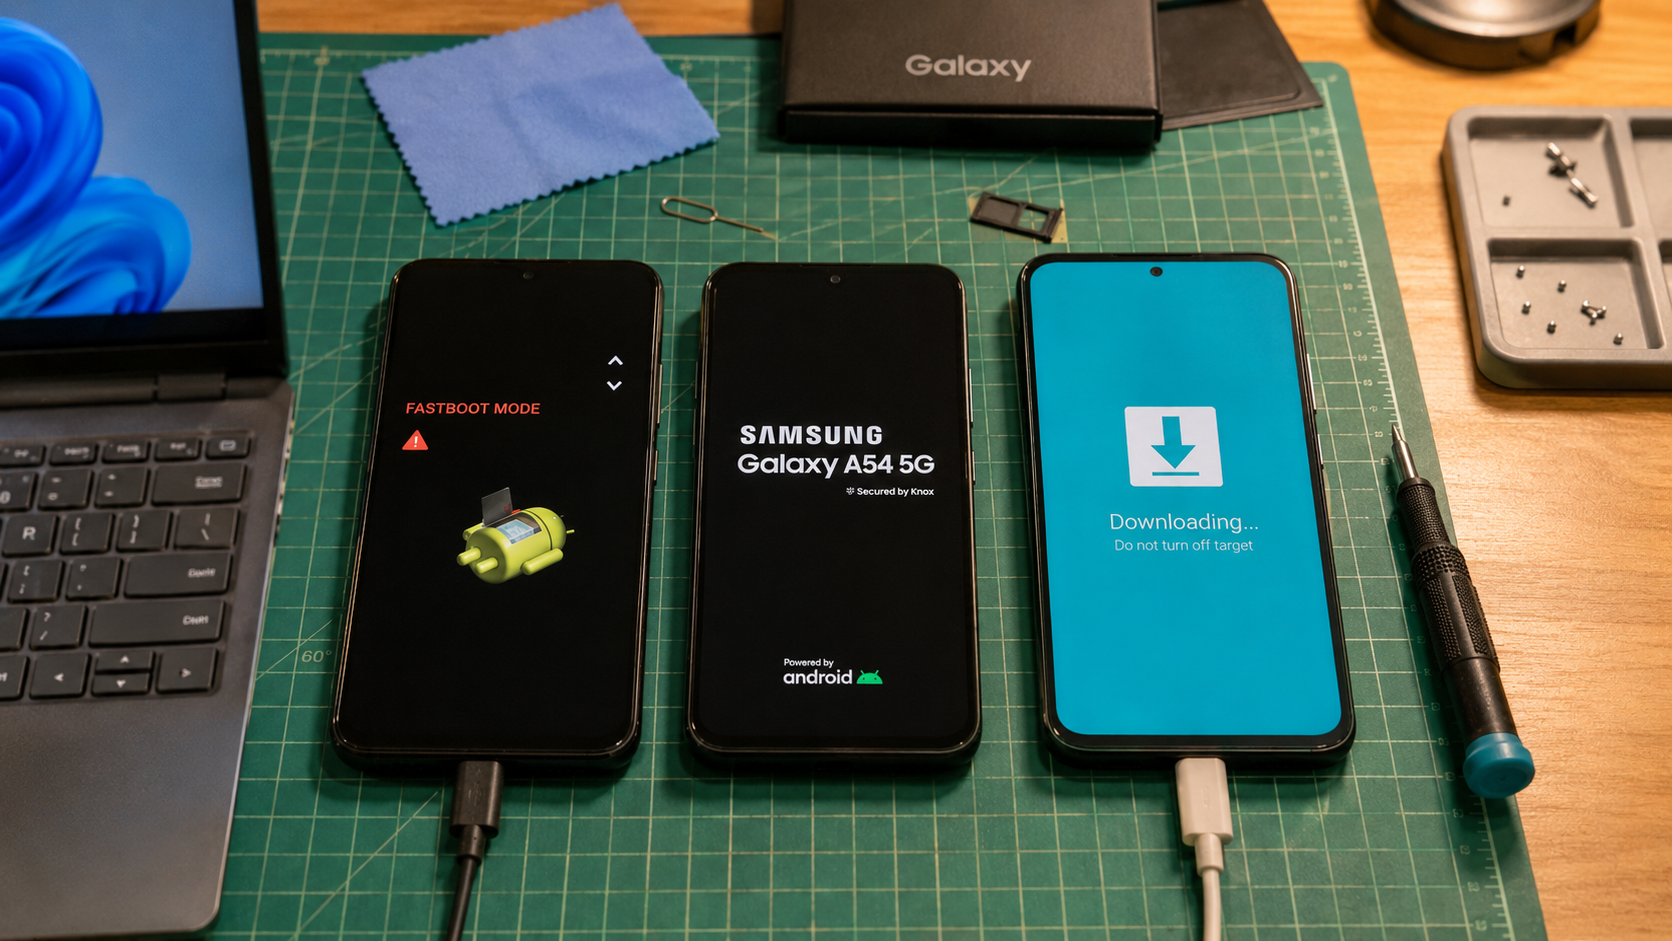
Write down what appears before changing anything. The first Samsung logo points to a different failure area than the carrier logo or lock screen. A loop after the lock screen can involve user data, app state, storage pressure, or a restored backup. A loop before the animation suggests a system update, boot, vendor, modem, or storage mount problem. A phone that opens Download Mode still has a bootloader path. A phone that opens Recovery still has a stock recovery path.
Also check the physical basics. Charge the phone for at least 30 minutes on a known good charger. Remove the case. Make sure the Side key, Volume Up, and Volume Down are not being held by a damaged button or case edge. A stuck Volume key can force a mode change and make a software fault look more serious.
Start with the lowest risk checks
- Let one post-update boot sit on charger long enough to rule out a slow first boot.
- Force restart with Side and Volume Down. If it boots, back up before testing anything else.
- Remove USB adapters, loose hubs, and accessories that may press buttons or interrupt charging.
- Ask what happened just before the loop. A carrier OTA, a One UI 6.1 or newer update, a nearly full storage warning, a restored backup, or a security app changes the next check.
- Record the model code from the box, SIM tray label when available, or Product Name in Download Mode.
These checks look plain, but they prevent the common bad move. A reset can erase the only copy of the owner’s data while the original fault might have been a stuck key, low battery during the update, or an app loop that Safe Mode could expose.
Use Recovery without wiping
On many recent Samsung phones, Recovery is easier to reach when a USB cable is connected to a computer. From a looping state, hold Side and Volume Down until the screen goes black. Move to Side and Volume Up while USB is connected, then release when Android Recovery appears.
In Recovery, use the volume keys to move and the Side key to select. Choose Reboot system now first. If the same loop returns, go back to Recovery and look for options that do not erase data.
Wipe cache partition can be tried if the menu shows it. Some Samsung builds and regions vary, so the option may be missing. Repair apps can also appear on some software versions. Use it before Wipe data because it asks Android to rebuild app optimization on the next boot. That matters when the OTA installed but the first app pass keeps failing.
Apply update from ADB belongs in a narrower lane. Use it only with the exact signed OTA package for the current build path and region. Incremental packages expect a known previous build and a clean system state. A random update ZIP is a poor repair tool for this A54 problem.
Try Safe Mode when Android nearly boots
Safe Mode helps only when the phone reaches the Samsung animation or lock screen long enough to catch it. When the Samsung logo appears, hold Volume Down until Android finishes booting. If Safe Mode appears in the lower corner, back up immediately.
A successful Safe Mode boot points toward third-party app state, a restored backup, launcher trouble, device management tools, VPN or security apps, or storage pressure during app optimization. Start with the apps and settings that changed just before the OTA.
- Remove recently installed launchers, lock screen tools, VPNs, cleanup apps, and device admin tools.
- Free internal storage before restarting normally.
- Keep the phone on Wi-Fi and power while Play Store and Galaxy Store finish updates.
- Restart once into normal mode. If the same loop returns, stop repeating the cycle.
If Safe Mode never appears, move back to Recovery or Download Mode checks. The phone may not be reaching the stage where third-party apps can be limited.
Use Download Mode as a model check
Download Mode is Samsung’s firmware service path. It proves the bootloader can still identify the device and talk to a computer. It does not give permission to flash the first package that looks close.
From a black or powered off state, hold Volume Up and Volume Down while connecting USB-C to a computer. Confirm with Volume Up if the warning screen appears. Record Product Name and any visible software revision information. Product Name is the key detail. SM-A546B, SM-A546E, SM-A546U, SM-A546U1, SM-A546W, and SM-A5460 do not belong in one firmware pile.
On Windows 10 or Windows 11, use Samsung USB Driver, a direct USB port, and a real data cable. Avoid hubs and loose front panel ports. If the phone only charges, reinstall the driver, change cables, and change ports before any firmware attempt. If two known good cables and two ports disconnect during transfer, stop. A USB fault during a firmware write can make recovery harder.
Match CSC and bootloader revision
Firmware decisions on the A54 family depend on exact model, region, carrier lane, and binary revision. SM-A546B/DS in the UK or Europe, SM-A546E in markets such as Australia and parts of Asia, SM-A546U and SM-A546U1 in the United States, SM-A546W in Canada, and SM-A5460 in another regional lane can all carry different update behavior.
CSC carries regional and carrier configuration. It affects update channel, carrier apps, APN behavior, and sometimes modem expectations. A phone that failed after a carrier OTA should be repaired with a matching carrier or region lane, not a package chosen only because the retail name says Galaxy A54.
For Odin-style service firmware, BL is bootloader, AP is the main system package, CP is modem, and CSC is the regional package. HOME_CSC is commonly chosen when the goal is to preserve user data with a matching package. CSC usually performs a clean regional install and wipes data. Neither path can guarantee data if storage is already failing, encryption state is broken, or the package is wrong.
Check bootloader revision before any downgrade idea. Samsung firmware uses binary revision control. A lower binary package should be rejected once the phone has a higher bootloader revision. Avoid patched tools, repartition files, and PIT files for owner repair. The safe lane is same model, correct CSC family, current or higher binary, stable USB, and no repartition.
Use Smart Switch before forum firmware
Samsung Smart Switch on a PC or Mac is the better owner-facing software recovery path before firmware files from forums. Its emergency software recovery and initialization workflow is built for failed software update cases and also checks driver and USB recognition. Read every warning before continuing because initialization can erase data.
Smart Switch can fail when the device is not recognized, the USB link is unstable, the region is unsupported, or the phone is too damaged to answer. Try another USB port, reinstall the device driver from Smart Switch, and restart the computer once. Avoid retrying the same failed recovery on a cable that keeps disconnecting.
If Smart Switch gives an emergency recovery code, keep it with the repair notes. It can help continue recovery from another computer. If Smart Switch cannot identify the A54 but Download Mode works, the next firmware decision needs a technician who can match model, CSC, and binary revision before writing anything.
Reset only after the data choice
Factory reset can be the correct repair when the OTA installed, system partitions are intact, and broken user data or app state blocks boot. Use it after the data decision, not as the opening move.
Before Wipe data, confirm that the owner accepts local data loss. Photos, downloads, app data, authenticator tokens, WhatsApp local databases, and banking app state may be gone unless they were already backed up. A reset can also ask for the Google account previously used on the phone during setup. If the owner does not know that account, use official account recovery or proof-of-purchase support before wiping.
Use Recovery reset only after lower-risk checks have failed. That means force restart, Safe Mode if reachable, non-destructive Recovery options, USB and driver confirmation, and Smart Switch assessment. If the phone is under warranty, or the owner values the data more than the device, service assessment comes before wiping.
Bench decision path
- Charge the phone and check the buttons.
- Let one post-update boot finish if it is only slow.
- Force restart with Side and Volume Down.
- Back up immediately if Android boots.
- Try Safe Mode if Android almost reaches the lock screen.
- Use Recovery with USB connected and choose Reboot system now first.
- Use Wipe cache partition or Repair apps if those options appear.
- Record Product Name and software revision in Download Mode.
- Try Smart Switch emergency recovery before random firmware packages.
- Move to firmware repair or reset only after model, CSC, binary revision, USB stability, backup status, and Google account risk are clear.
The companion HalabTech page on Android recovery modes can help if you need a broader mode reference. For this A54 case, keep the work narrow. Prove the mode, protect the data, match the device, and stop before any step you cannot explain to the owner.
Stop when symptoms point to hardware
Stop software attempts if Recovery repeatedly shows mount errors for data, metadata, or cache. Stop if the phone overheats quickly, powers off while charging, disconnects from USB on multiple cables, or fails verification with a package that matches the model and binary revision. These signs can point to failing storage, port damage, battery instability, or board-level trouble.
Also stop after a security or verification failure caused by an earlier flash attempt. Another guessed package can hide the original cause under new errors. The useful repair note is the exact A54 model, the mode that still opens, the Recovery message, the Download Mode product name, the USB behavior, and whether data recovery matters more than getting the phone to boot today.
Original HalabTech illustration for this repair guide.