
FIX☆j3308☆flash error(fused) -2 binary 2\\\حل مشكلة الحماية REV: (S-2) (T-2) (R-2) (A-2) (P-2)\\REV: (K1) (S1 FIX☆J3308☆flash error(fused) -2 binary 2 لجهاز J3308 الحل الحصري والنهائي

اخلاء مسؤولية | DISCLAIMER
السلام عليكم ورحمة الله وبركاته
بسم الله الرحمن الرحيم
حياكم الله متابعي موقع حلب تك
نقدم لكم
حل مشكلة الحماية REV: (S-2) (T-2) (R-2) (A-2) (P-2)\\REV: (K1) (S1
FIX☆J3308☆flash error(fused) -2 binary 2
لجهاز J3308 الحل الحصري والنهائي
تابعو معي الشرح:
اولا نطرح عليكم المشكلة التي تسبب هذا الخطا
هذا الخطا ياتي عن طريق تفليش روم معدل عند عدم الغاء قفل البوت لودر CROM SERVICE:LOCK
عندها سوف يتم قفل الحماية وعند التفليش بروم رسمي او اي روم ومع ذالك الكومبينيشن وان كانت الحماية مطابقة لم يتم قبول اي تفليش في هذا الوضع
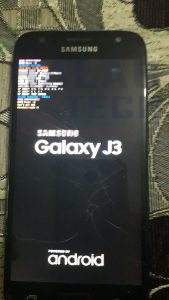
لم يتم تركيب اي ملف من الروم عند التركيب الروم سوف يظهر لك خطا في الحماية عند تركيب ABOOT كما موضح في الصورة التالية :
وعند تركيب من الروم الرسمي فقط RECOVERY-SYSTEM-BOOT-CSC-CP
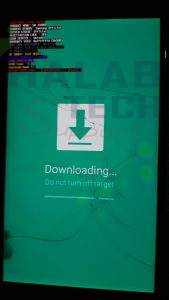
يقبل التفليش ولكن بدون فائدة سوف يظهر لك DOWNLOADING MODE على الشعار الاول كما موضح في الصورة التالية :
الان نقدم اليكم الحل الحصري والنهائي لهذه المشكلة :
اولا نقوم بتحميل روم كومبينيشن من هنا حصرا
بعد تحميل الروم نقوم بفك الضغط عنها ضمن مجلد ثم ناخذ الروم الى داخل مجلد جديد
بعدها نقوم بفك الضغط عنها ايضا عن طريق Zip-7 لتحميل برنامج فك الضغط من هنا ايضا
الان يتم ظهور 21 من الملفات التي كانت داخل الروم ولكن بعض من الملفات لا تلزم الان ناخذ من الروم هذه الملفات :
• adspso.bin
• cache.img.ext4
• cmnlib.mbn
• keymaster.mbn
• lksecapp.mbn
• msadp.mbn
• NON-HLOS.bin
• persist.img.ext4
• recovery.img
• rpm.mbn
• sec.dat
• system.img.ext4
• tz.mbn
• userdata.img.ext4
الان نضع هذه الملفات ايضا ضمن مجلد جديد ونقوم بضغط الملفات الى صيغة tar
ملاحظة : يتم ضغط الملفات كل ملف بمفرده ليس جميعها مع بعضها كما موضح في الصورة :

الان بعد ضغط الملفات نقوم بل الخروج من المجلد ونقوم بتحميل برنامج Odin prince comsys 3.12 حصرا من هنا
الان نقوم بفتح الاودين ونبدا بتركيب كل ملف بمفرده عن طريق خانة AP نقوم بعدها بارجاع الهاتف الى وضع DOWNLOADING MODE او يتم ارجاعه تلقائيا ونقوم بتركيب باقي الملفات
ملاحظة يتم ترك ملف • cache.img.ext4 اخر ملف نقوم بتفليشه
الان بعد تركيب اخر ملف سوف يظهر لك الخطا ولكن تم تصفير الحماية نذهب الى DOWNLOADING MODE نرى ان الحماية قد تغيرت الى هذا الوضع
SW REV has returned to (S1) (T1) (R2) (A1) (P1)
SW REV (K1) (S1)
الان نذهب ونفتح الاودين الرسمي او Z3x box ونقوم بتفليش روم كومبينيشن كامل مطابق للحماية نرى ان قد تم تفليشها بل الكامل
بعد تفليش الروم الكومبينيشن يمكنك اعادة الهاتف الى وضعه الطبيعي عن طريق تفليش روم رسمي كامل
ومبروك عليك حل مشكلة FIX☆j3308☆flash error(fused) -2 binary 2
فريق حلب تك -ABOODE ALHOMSE
=============================
FIX☆j3308☆flash error(fused) -2 binary 2
Device has been restored to working condition again, no more galaxy screen with Odin mode, only the standard odin download mode with green background, system is fully functional like nothing ever happened, no recovery errors anymore either
____________________________________________
Warranty void has now returned to 0×1 and not 0×fffffffe like it was
____________________________________________
Qualcomm secure boot has returned to (CSB) and not 0×fffffffe, like it was
____________________________________________
SW REV has returned to (S1) (T1) (R2) (A1) (P1)
SW REV (K1) (S1)
and not (S-2) (T-2) (R-2) (A-2) (P-2) like it was,
___________________________________________
used the same firmware I tried to previously flash after repair and this time the BL, AP & CSC all flashed without an issue, whereas before the entire BL.md5 would not flash would give aboot(fused-2) binary 2,
___________________________________________
Heres how I repaired the J3308 8.0 running the new REV002 8.1 OREO SDK this should work for all other flash errors of the correct binary,
Download the Combination factory binary for your REV00? By support.halabtech from here
Do not flash the entire combination.md5 you will receive the same error aboot(fused)-2 binary 2,
Downlaod 7zip.exe of you already havent got it and install it,
From Here
___________________________________________
INSTRUCTIONS
___________________________________________
Extract the combination.tar first to get the combination.md5
#1 go to the folder containing your combination.md5 or put it in a folder
#2 right click on file & move the mouse cursor over the 7-zip option.
#3 click “extract to combination_ FA_70_j3308 ect ect ect ” option, the combination rom is now being extracted to your folder, now exit 7zip
#4 from the 21 files we will need only the following,
• adspso.bin
• cache.img.ext4
• cmnlib.mbn
• keymaster.mbn
• lksecapp.mbn
• msadp.mbn
• NON-HLOS.bin
• persist.img.ext4
• recovery.img
• rpm.mbn
• sec.dat
• system.img.ext4
• tz.mbn
• userdata.img.ext4
________________________________________
DO NOT USE THESE FILES
________________________________________
These will all give you SW REV (fused)-2 binary 2
• apdp.mbn
• devcfg.mbn
• sbl1.mbn
• aboot.mbn
You wont need the .pit file or the modem file these are irrelivent to this repair.
#5 in the folder with the 21 files delete the files above under DO NOT USE THESE FILES also delete .pit and modem as they are not needed,
#6 with the files that are left as described above in the needed files, individually on each file right click on them, then move the mouse cursor over the “7-zip”, now select “add to archive”
#7 leave the names as they are do not edit them,
Select the options as following,
“archive format” = .tar
“Compression method” = Store
#8 Next press ok, now do this for all of the files, NOTE YOU MUST archive each file individually and not all at once or Odin will not flash the file and will crash every single time
#9 once all 14 files have been converted to .tar archives individually, you can then exit the folder,
#10 open Odin prince comsys 3.12 works or Odin 3.13.1 standard either will do, to Downlaod From Here
#11 click the “AP” TAB now navigate to your folder containing your 14 .tar files, select the first in line to flash and then click ok.
12# leave “auto reboot” as it is and checked, now connect your j3308 in either download mode that appears and wait for it to say “added” in Odin,
13# click start and wait for it to pass and reboot,
14# do this for all of the 14 .tar files but make sure “cache.img.ext4” is last to be flashed,
15# after cache is flashed your device will reboot and you will now see the colorful circle that is spinning once this has completed the device will reboot and your issue is now solved and you can now flash the stock firmware back to the device to have it
 Congratulations to you


 WhatsApp Channel